
In this step-by-step Keras tutorial, you’ll learn how to build a convolutional neural network in Python!
In fact, we’ll be training a classifier for handwritten digits that boasts over 99% accuracy on the famous MNIST dataset.
Before we begin, we should note that this guide is geared toward beginners who are interested in applied deep learning.
Our goal is to introduce you to one of the most popular and powerful libraries for building neural networks in Python. That means we’ll brush over much of the theory and math, but we’ll also point you to great resources for learning those.
Before we start…
Recommended Prerequisites
The recommended prerequisites for this guide are:
To move quickly, we’ll assume you have this background.
Why Keras?
Keras is our recommended library for deep learning in Python, especially for beginners. Its minimalistic, modular approach makes it a breeze to get deep neural networks up and running. You can read more about it here:
WTF is Deep Learning?
Deep learning refers to neural networks with multiple hidden layers that can learn increasingly abstract representations of the input data. This is obviously an oversimplification, but it’s a practical definition for us right now.
For example, deep learning has led to major advances in computer vision. We’re now able to classify images, find objects in them, and even label them with captions. To do so, deep neural networks with many hidden layers can sequentially learn more complex features from the raw input image:
- The first hidden layers might only learn local edge patterns.
- Then, each subsequent layer (or filter) learns more complex representations.
- Finally, the last layer can classify the image as a cat or kangaroo.
These types of deep neural networks are called Convolutional Neural Networks.
WTF are Convolutional Neural Networks?
In a nutshell, Convolutional Neural Networks (CNN’s) are multi-layer neural networks (sometimes up to 17 or more layers) that assume the input data to be images.

By making this requirement, CNN’s can drastically reduce the number of parameters that need to be tuned. Therefore, CNN’s can efficiently handle the high dimensionality of raw images.
Their underlying mechanics are beyond the scope of this tutorial, but you can read more about CNN’s here.
What this tutorial is not:
This is not a complete course on deep learning. Instead, this tutorial is meant to get you from zero to your first Convolutional Neural Network with as little headache as possible!
If you’re interested in mastering the theory behind deep learning, we recommend this great course from Stanford:
A quick tip before we begin:
We tried to make this tutorial as streamlined as possible, which means we won’t go into too much detail for any one topic. It’s helpful to have the Keras documentation open beside you, in case you want to learn more about a function or module.
Keras Tutorial Contents
Here are the steps for building your first CNN using Keras:
- Set up your environment.
- Install Keras and Tensorflow.
- Import libraries and modules.
- Load image data from MNIST.
- Preprocess input data for Keras.
- Preprocess class labels for Keras.
- Define model architecture.
- Compile model.
- Fit model on training data.
- Evaluate model on test data.
Step 1: Set up your environment.
First, make sure you have the following installed on your computer:
- Python 3+
- SciPy with NumPy
- Matplotlib (Optional, recommended for exploratory analysis)
We strongly recommend installing Python, NumPy, SciPy, and matplotlib through the Anaconda Distribution. It comes with all of those packages. Plus, it makes the next step much easier.
Once you’ve installed Anaconda, you can open up the Anaconda Navigator application that came with it. From here, you can manage your environments.
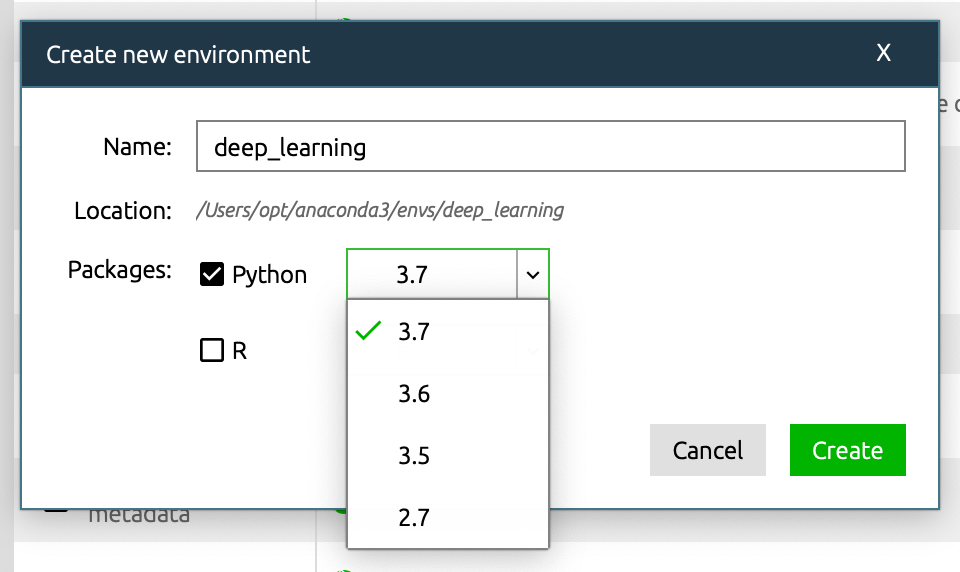
As a best practice, the first thing we recommend is creating a new environment specifically for deep learning with Keras and Tensorflow. This helps keep your packages and dependencies organized, without spilling into other things you’re working on.
To do so, click on the Environments tab on the left and then click Create at the bottom of the list. Select Python 3.7 and give it a name:
You can check to see if you’ve installed everything correctly:
Go to your command line program (Terminal on a Mac) and type in:
|
1 |
$ conda activate deep_learning |
This will switch over to the new environment you just installed. Then, type in:
|
1 |
$ python |
You’ll see the Python interpreter:
|
1 2 |
Python 3.7.13 (default, Mar 28 2022, 07:24:34) [Clang 12.0.0 ] :: Anaconda, Inc. on darwin |
Next, you can import your libraries and print their versions:
|
1 2 3 4 5 6 7 |
>>> import numpy >>> import matplotlib >>> print( numpy.__version__ ) 1.21.5 >>> print( matplotlib.__version__ ) 3.5.1 >>> quit() |
Note: If either or both of these libraries were not found, don’t worry (sometimes Anaconda changes which libraries come installed by default). You can install them along with the next two libraries in Step 2:
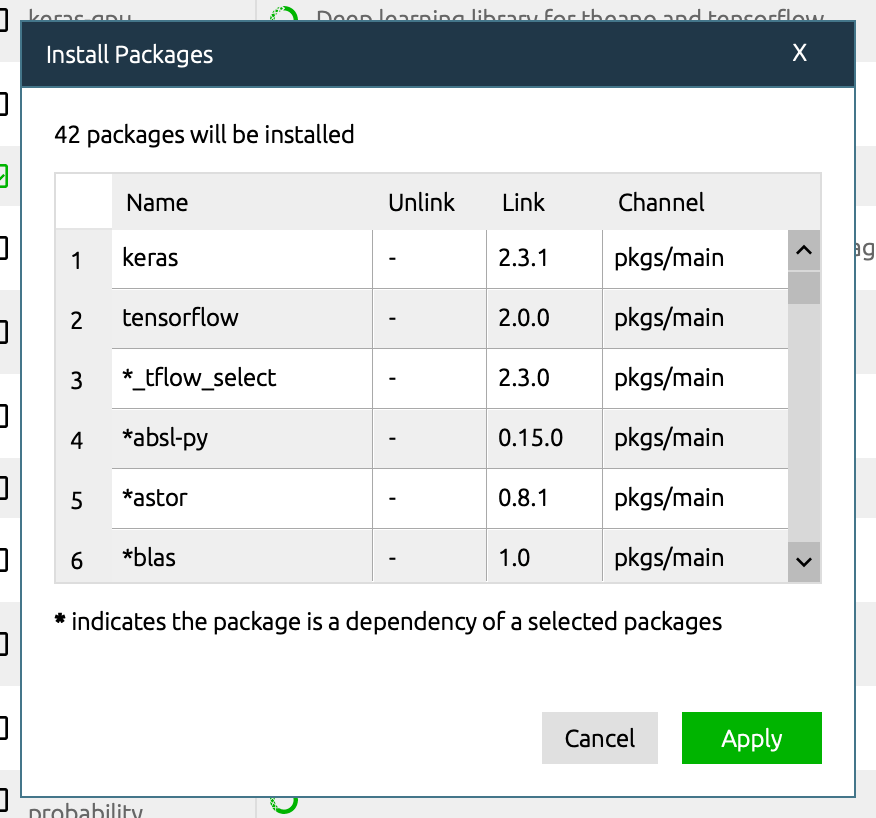
Step 2: Install Keras and Tensorflow.
It wouldn’t be a Keras tutorial if we didn’t cover how to install Keras (and TensorFlow). TensorFlow is a free and open source machine learning library originally developed by Google Brain. These two libraries go hand in hand to make Python deep learning a breeze.
The good news is that if you used Anaconda, then you can install them directly through Anaconda Navigator.
- Simply navigate to the Environments tab.
- Select Not Installed from the package manager.
- Search for “tensorflow” in the search bar.
- Then check the following packages: keras and tensorflow.
- Click Apply at the bottom, then Apply in the pop-up prompt.

Note: if you run into issues at this step, make sure your Anaconda installation is up-to-date. You can update it from the command line using the command conda update anaconda .
You can confirm it’s installed correctly, you can run this in the command line:
|
1 2 3 |
$ python -c "import keras; print( keras.__version__ )" Using TensorFlow backend. 2.3.1 |
If your packages are outdated, or if you run into any other issues, you can refer to the Anaconda documentation for instructions.
Perfect, now let’s start a new Python file and name it keras_cnn_example.py. Alternatively, you can also run the code in a new Jupyter Notebook (which comes with Anaconda).
Step 3: Import libraries and modules.
Let’s start by importing numpy and setting a seed for the computer’s pseudorandom number generator. This allows us to reproduce the results from our script:
|
1 2 |
import numpy as np np.random.seed(123) # for reproducibility |
Next, we’ll import the Sequential model type from Keras. This is simply a linear stack of neural network layers, and it’s perfect for the type of feed-forward CNN we’re building in this tutorial.
|
1 |
from keras.models import Sequential |
Next, let’s import the “core” layers from Keras. These are the layers that are used in almost any neural network:
|
1 |
from keras.layers import Dense, Dropout, Activation, Flatten |
Then, we’ll import the CNN layers from Keras. These are the convolutional layers that will help us efficiently train on image data:
|
1 |
from keras.layers import Convolution2D, MaxPooling2D |
Finally, we’ll import some utilities. This will help us transform our data later:
|
1 |
from keras.utils import np_utils |
Now we have everything we need to build our neural network architecture.
Step 4: Load image data from MNIST.
MNIST is a great dataset for getting started with deep learning and computer vision. It’s a big enough challenge to warrant neural networks, but it’s manageable on a single computer. That makes it perfect for this Keras tutorial. We discuss it more in our post: Fun Machine Learning Projects for Beginners.
The Keras library conveniently includes it already. We can load it like so:
|
1 2 3 4 |
from keras.datasets import mnist # Load pre-shuffled MNIST data into train and test sets (X_train, y_train), (X_test, y_test) = mnist.load_data() |
We can look at the shape of the dataset:
|
1 2 |
print( X_train.shape ) # (60000, 28, 28) |
Great, so it appears that we have 60,000 samples in our training set, and the images are 28 pixels x 28 pixels each. We can confirm this by plotting the first sample in matplotlib:
|
1 2 |
from matplotlib import pyplot as plt plt.imshow(X_train[0]) |
And here’s the image output:

In general, when working with computer vision, it’s helpful to visually plot the data before doing any algorithm work. It’s a quick sanity check that can prevent easily avoidable mistakes (such as misinterpreting the data dimensions).
Step 5: Preprocess input data for Keras.
When using the TensorFlow backend, you must explicitly declare a dimension for the number of channels in the input images. For example, a full-color image with all 3 RGB channels will have a channel value of 3.
Our MNIST images only have 1 channel, but we must explicitly declare that.
In other words, we want to transform our dataset from having shape (n, width, height) to (n, width, height, channels).
Here’s how we can do that easily:
|
1 2 |
X_train = X_train.reshape(X_train.shape[0], 28, 28, 1) X_test = X_test.reshape(X_test.shape[0], 28, 28, 1) |
To confirm, we can print X_train’s dimensions again:
|
1 2 |
print( X_train.shape ) # (60000, 28, 28, 1) |
The final preprocessing step for the input data is to convert our data type to float32 and normalize our data values to the range [0, 1].
|
1 2 3 4 |
X_train = X_train.astype('float32') X_test = X_test.astype('float32') X_train /= 255 X_test /= 255 |
Now, our input data are ready for model training.
Step 6: Preprocess class labels for Keras.
Next, let’s take a look at the shape of our class label data:
|
1 2 |
print( y_train.shape ) # (60000,) |
Hmm… that may be problematic. We should have 10 different classes, one for each digit, but it looks like we only have a 1-dimensional array. Let’s take a look at the labels for the first 10 training samples:
|
1 2 |
print( y_train[:10] ) # [5 0 4 1 9 2 1 3 1 4] |
And there’s the problem. The y_train and y_test data are not split into 10 distinct class labels, but rather are represented as a single array with the class values.
We can fix this easily:
|
1 2 3 |
# Convert 1-dimensional class arrays to 10-dimensional class matrices Y_train = np_utils.to_categorical(y_train, 10) Y_test = np_utils.to_categorical(y_test, 10) |
Now we can take another look:
|
1 2 |
print( Y_train.shape ) # (60000, 10) |
There we go… much better!
Step 7: Define model architecture.
Now we’re ready to define our model architecture. In actual R&D work, researchers will spend a considerable amount of time studying model architectures.
To keep this tutorial moving along, we’re not going to discuss the theory or math here. This alone is a rich and meaty field, and we recommend the CS231n class mentioned earlier for those who want to learn more.
Plus, when you’re just starting out, you can just replicate proven architectures from academic papers or use existing examples. Here’s a list of example implementations in Keras.
Let’s start by declaring a sequential model format:
|
1 |
model = Sequential() |
Next, we declare the input layer:
|
1 |
model.add(Convolution2D(32, (3,3), activation='relu', input_shape=(28,28,1))) |
The input shape parameter should be the shape of 1 sample. In this case, it’s the same (28, 28, 1) that corresponds to the (width, height, channels) of each digit image.
But what do the first two parameters represent? They correspond to the number of convolution filters to use (32) and the number of rows and columns (3, 3) in each convolution kernel.
*Note: The step size is (1,1) by default, and it can be tuned using the ‘strides‘ parameter.
We can confirm this by printing the shape of the current model output:
|
1 2 |
print( model.output_shape ) # (None, 26, 26, 32) |
That output corresponds to (samples, new_rows, new_cols, filters). In other words, the current model will output all of the samples, convoluted into a 26×26 array using 32 filters.
Next, we can simply add more layers to our model like we’re building legos:
|
1 2 3 |
model.add(Convolution2D(32, (3,3), activation='relu')) model.add(MaxPooling2D(pool_size=(2,2))) model.add(Dropout(0.25)) |
Again, we won’t go into the theory too much, but it’s important to highlight the Dropout layer we just added. This is a method for regularizing our model in order to prevent overfitting. You can read more about the dropout method here.
MaxPooling2D is a way to reduce the number of parameters in our model by sliding a 2×2 pooling filter across the previous layer and taking the max of the 4 values in the 2×2 filter.
So far, for model parameters, we’ve added two Convolution layers. To complete our model architecture, let’s add a fully connected layer and then the output layer:
|
1 2 3 4 |
model.add(Flatten()) model.add(Dense(128, activation='relu')) model.add(Dropout(0.5)) model.add(Dense(10, activation='softmax')) |
For Dense layers, the first parameter is the output size of the layer. Keras automatically handles the connections between layers.
Note that the final layer has an output size of 10, corresponding to the 10 classes of digits.
Also note that the weights from the Convolution layers must be flattened (made 1-dimensional) before passing them to the fully connected Dense layer.
Here’s how the entire model architecture looks together:
|
1 2 3 4 5 6 7 8 9 10 11 |
model = Sequential() model.add(Convolution2D(32, (3,3), activation='relu', input_shape=(28,28,1))) model.add(Convolution2D(32, (3,3), activation='relu')) model.add(MaxPooling2D(pool_size=(2,2))) model.add(Dropout(0.25)) model.add(Flatten()) model.add(Dense(128, activation='relu')) model.add(Dropout(0.5)) model.add(Dense(10, activation='softmax')) |
Now all we need to do is define the loss function and the optimizer, and then we’ll be ready to train it.
Step 8: Compile model.
Now we’re in the home stretch! The hard part of the Keras tutorial is already over.
We just need to compile the model and we’ll be ready to train it. When we compile the model, we declare the loss function and the optimizer (SGD, Adam, etc.).
|
1 2 3 |
model.compile(loss='categorical_crossentropy', optimizer='adam', metrics=['accuracy']) |
Keras has a variety of loss functions and out-of-the-box optimizers to choose from.
Step 9: Fit model on training data.
To fit the model, all we have to do is declare the batch size and number of epochs to train for, then pass in our training data.
|
1 2 3 4 |
model.fit(X_train, Y_train, batch_size=32, epochs=10, verbose=1) # Epoch 1/10 # 7744/60000 [==>...........................] - ETA: 96s - loss: 0.5806 - acc: 0.8164 |
Easy, huh?
This might take a few minutes, but you’ll be able to track the progress as it goes.
You can also use a variety of callbacks to set early-stopping rules, save model weights along the way, or log the history of each training epoch.
Step 10: Evaluate model on test data.
Finally, we can evaluate our model on the test data:
|
1 |
score = model.evaluate(X_test, Y_test, verbose=0) |
Congratulations… you’ve made it to the end of this Keras tutorial!
We’ve just completed a whirlwind tour of Keras’s core functionality, but we’ve only really scratched the surface. Hopefully you’ve gained the foundation to further explore all that Keras has to offer.
For continued learning, we recommend studying other example models in Keras and Stanford’s computer vision class.
The complete code, from start to finish.
Here’s all the code in one place, in a single script.
|
1 2 3 4 5 6 7 8 9 10 11 12 13 14 15 16 17 18 19 20 21 22 23 24 25 26 27 28 29 30 31 32 33 34 35 36 37 38 39 40 41 42 43 44 45 46 47 48 49 |
# 3. Import libraries and modules import numpy as np np.random.seed(123) # for reproducibility from keras.models import Sequential from keras.layers import Dense, Dropout, Activation, Flatten from keras.layers import Convolution2D, MaxPooling2D from keras.utils import np_utils from keras.datasets import mnist # 4. Load pre-shuffled MNIST data into train and test sets (X_train, y_train), (X_test, y_test) = mnist.load_data() # 5. Preprocess input data X_train = X_train.reshape(X_train.shape[0], 28, 28, 1) X_test = X_test.reshape(X_test.shape[0], 28, 28, 1) X_train = X_train.astype('float32') X_test = X_test.astype('float32') X_train /= 255 X_test /= 255 # 6. Preprocess class labels Y_train = np_utils.to_categorical(y_train, 10) Y_test = np_utils.to_categorical(y_test, 10) # 7. Define model architecture model = Sequential() model.add(Convolution2D(32, (3,3), activation='relu', input_shape=(28,28,1))) model.add(Convolution2D(32, (3,3), activation='relu')) model.add(MaxPooling2D(pool_size=(2,2))) model.add(Dropout(0.25)) model.add(Flatten()) model.add(Dense(128, activation='relu')) model.add(Dropout(0.5)) model.add(Dense(10, activation='softmax')) # 8. Compile model model.compile(loss='categorical_crossentropy', optimizer='adam', metrics=['accuracy']) # 9. Fit model on training data model.fit(X_train, Y_train, batch_size=32, epochs=10, verbose=1) # 10. Evaluate model on test data score = model.evaluate(X_test, Y_test, verbose=0) |